Category Archives: Used Tools

#oggstreamer – Lasermarkings Designfiles

The Design of the Laser-Markings was done using Inkscape and GIMP – Many thanks to my sister this way, who made the OggStreamer look proper. The font used in all of the Files is called Xolonium which is licensed under GPL special thanks go to Severin Meyer who designed this great font.

You will notice that only FRONT,BACK and TOP are drawn in Inkscape – thats because of the great number of Logos it was easier to draw the BOTTOM directly with GIMP – and we already new at this moment, that the CorelDraw wouldn’t open our SVGs.

here are the PNG

DPI600_PIXELREWORK  - OggStreamer Graphik-Design BACK DPI600_PIXELREWORK - OggStreamer Graphik-Design FRONT
DPI600_PIXELREWORK - OggStreamer Graphik-Design TOP DPI600_PIXELREWORK - OggStreamer Graphik-Design BOTTOM

The whole process of Laser Marking was not really easy. One main reason for this was that Inkscape always exports Fonts Anti-Aliased … And opening the SVGs in CorelDraw directly didn’t work either. with Fonts Anti-Aliased exported we produced strange effects on the Laser, which apparently only uses Black and White as information … There was some trickery needed in order to get the Design done proper. We also tweaked the Bitmaps on Pixel-by-Pixel to get good results … So your millage may very if you want to use the PNGs from above.

Because the case was already anodized aluminum – and engraving already bright anodized aluminum results in poor contrasted, we needed to use special Transfer-Tape (CerMark LM6018) and Marking Paste (markSolid 904). The Transfer-Tape was used for the non-dense Designs (FRONT,BACK,TOP) – the Marking Paste was applied with an Airbrush for the denser populated BOTTOM.

the SVGs for FRONT, BACK, TOP can downloaded from the mcad-repository

#oggstreamer – STM8 UART Flasher for Linux

I just completed a rough Version 0.3 of stm8flash – a handy little tool that allows you to programm a STM8 over a serial uart interface (using the STM8 internal bootloader)

The software is based upon stm32flash written by Geoffrey McRae – many thanks to you that way. STM is using a similar Bootloader-Protocol for the STM32s and STM8s which made porting the flashertool not so difficult.

The stm8flash can be downloaded via sourceforge. It works as desired for my 32K STM8S105 device. But it is only designed to work with 32K devices so far. Also it is currently using the so-called “Reply” Mode, which is available on STM8A-128K, STM8S-32K, STM8S-128K and STM8L-64K. If you want to use this tool in non reply mode, then take a look at stm8.c and search for “REPLY” – it should be fairly easy to adapted to the other devices as well.

stm8flash also introduces a new flag “-d”, which stands for using the DTR-Line to trigger a device reset. (Arduino-Style 😉 )

Maybe in future somebody could try to merge stm32flash and stm8flash as the share a lot of common code.
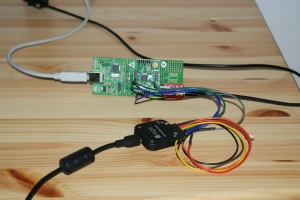
What was really helpful for debugging the code and get the thing running, was a SALEAE Logic-Analyzer (with Software RS-232 decode functionality). It is definitely a powerful tool for such tasks.

Further this step just marks the first Milestone for the ongoing NetIdee-Project. 🙂

#oggstreamer – Project Status 2011

Hi everybody – finally i found time to write some code for the Oggstreamer and i put to work some of the basic functions of the device. I started with the StatusLEDs and the VU-Meter …

There are some news: I switched to the IAR Workbench Kickstarter Version for STM8 because i like the Idea of having an all in on package for Firmware development – And especially when it comes to debugging i find this Software package quite comfortable. The preliminary Sourcecode for the STM8 Firmware got new git-repository, which can be found here. The Kickstarter Version is limited to 8 KB Codesize, which should not be a problem – i expect the firmware to be around 4KB big – the remaining 24KB of flash can be used to store patchfile updateimages for the VS1063

The first thing i implemented on the firmware are the routines for LED – Muxing. We are using one complete PORT (GPIOB) and some controll Lines on GPIOA to drive the LEDs. Timer4 is used to generate a 450 Hz Inerrupt and because we are Muxing 3 different LED-Rows (VU-LEFT, VU-RIGHT and STATUS) – each row gets updated at a 150 Hz Refresh rate. The CPU usage for the muxing is around 0,2 % which is little enough in my eyes.

I also tried to get the VS1063 running – but measuring the Crystal it showed that it is not oscillating  – I also remembered that i had some shorts on the supply lines, because at first try the VS1063 was not proper soldered – maybe I killed the VS1063 and i have to replace it now – but this issue definitely needs further investigation.

My best wishes to all of you for the new year. 🙂


Introducing the Tools: IDE for STM8

For this project we are using a STM8S Microcontroller from STMicroelectronics. To be honest using this Micro wasn’t selected through a carefull research, but rather through the fact that STMicroelectronics gave away free-Kits of this uC on a number of occasions. So i had those kits lying around at home. The STM8S is certainly a descent 8bit uC with reasonable pricing so i don’t regret this decision. But it has one big drawback in my eyes – for developing with this uC one has to use Windows Operating-system. Again on the other hand the development kit for this uC is dirt cheap and it provides an integrated incircuit debugger – which also has some limited possibilities for non-intrusive variable monitoring.

The IDE for developing this uC comes directly from STM – it is called: ST Visual develop IDE

The C-Compiler (freely available, limited to 32kB) comes from Raisonance

To monitor variables in Realtime – STM provides the STM Studio Tool

Under http://www.emcu.it/STM8.html you can find valuable information about developing on the STM8 platform.


Introducing the Tools: Sketchup for MCAD

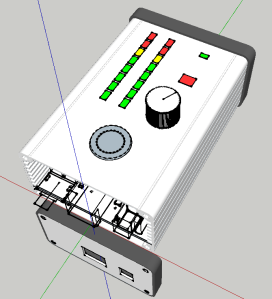
Sketchup is free and simple. Yet it is a powerful tool for MCAD. I run Sketchup 8 and Sketchup 7 under WINE one my Linux computer and it works quite decent. So why am i using Sktechup 7 also? The answer: Google provided a DXF Importer for Sketchup 7 – which is not included in the Free Sketchup 8 Version anymore. From the PCB designer i get a DXF (including the height information of the components) – with Sketchup 7 the DXF is imported and saved. The resulting .skp file is opened with Sketchup 8 and automatically converted to the new Version.

For those of you who are using Eagle for the ECAD – there is also a great project interfacing Eagle and Sketchup. Check it out: http://eagleup.wordpress.com/